Taking professional product photos is about more than just pointing and shooting. You are creating a powerful sales tool. Your goal is simple: use clear lighting, a clean background, and sharp focus to build customer trust and showcase your product's best features. Get this right, and you’ll see it reflected directly in your sales.
Why Better Photos Mean More Sales
Before picking up a camera, it's crucial to understand the "why." In e-commerce, your product photos are your storefront, sales team, and first impression rolled into one. Customers can’t touch or test your products, so they rely entirely on the images you provide.
This is where high-quality photography becomes a business necessity, not just a nice-to-have.
Think of it this way: your photos are working for you 24/7. They are either convincing someone to buy or sending them to a competitor. Blurry, dark, or messy images can make even the most luxurious products look cheap and untrustworthy. Conversely, crisp, bright, and professional photos signal quality and give a customer the confidence they need to click "add to cart."

The Direct Impact on Your Bottom Line
Great photography isn't just about aesthetics; it has a real, measurable effect on your business's success. It’s a direct lever you can pull to grow your revenue and build a memorable brand.
Here’s how professional images translate into actionable business wins:
- Increase Conversion Rates: Clear, appealing visuals help customers imagine the product in their hands, removing hesitation. E-commerce businesses with professional-grade images can see up to a 30% increase in conversions. This is why 72% of marketers now depend on platforms that showcase high-quality visuals.
- Justify Premium Pricing: High-quality photos make your products look more valuable, giving you the power to command higher prices without pushback.
- Reduce Product Returns: Accurate, detailed photos set clear expectations. When a customer receives exactly what they saw online, they're far less likely to send it back.
- Build a Strong Brand Identity: A consistent and professional visual style across your store makes your brand instantly recognizable and trustworthy.
The single biggest mistake I see new business owners make is underestimating the power of photography. They treat it like an expense, not an investment. But trust me, your photos are doing more selling than any product description ever will.
This guide provides actionable steps on how to take professional product photos that work hard for your business. Mastering this skill ensures your online presence reflects the true quality of your products and helps you stand out.
And for those still figuring out where to build their online home, it’s worth exploring the best e-commerce platform for small business to make sure your amazing photos get the showcase they truly deserve.
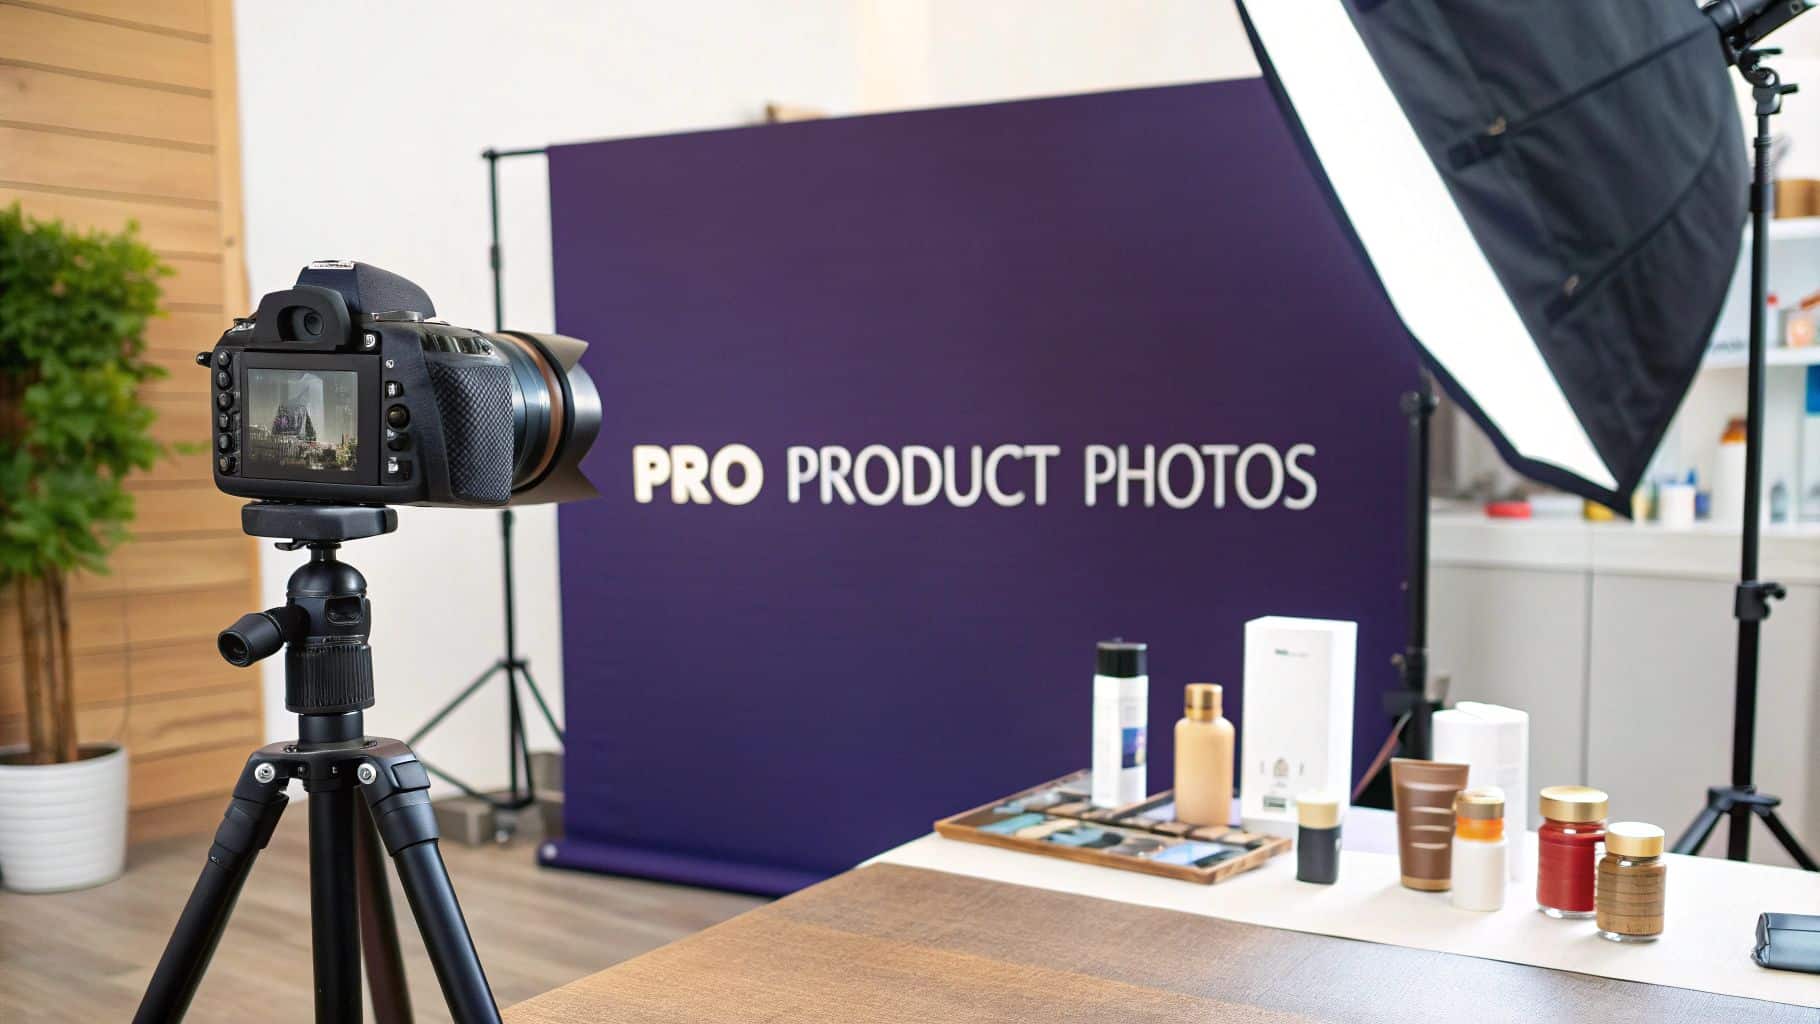
Building Your DIY Photography Studio
You don't need a high-end studio to take incredible product photos. Many successful brands have been built on stunning images shot in the corner of a living room. The secret is knowing what gear actually makes a difference and how to use it effectively without overspending.
Your first step is to gather a few core pieces of equipment. This isn't about buying the most expensive tools; it's about smart, versatile items that give you control. Think of it as a three-legged stool: a solid camera, a sturdy tripod, and flexible lighting are the essential pillars.
Your Camera: The Heart of Your Setup
The best camera for product photography is likely the one you already own. For most business owners, that’s the smartphone in your pocket. Modern phone cameras are incredibly powerful and more than capable of producing crisp, high-quality images for your website and social media.
If you want more manual control, a Digital SLR (DSLR) or a mirrorless camera is a great next step. These cameras offer superior image quality and the freedom to change lenses, opening up creative possibilities. But let's be clear: a fancy camera with bad lighting will always lose to a smartphone with great lighting.
A Tripod: Your Secret Weapon for Sharpness
A tripod is non-negotiable. It is the single best tool for eliminating blur from shaky hands, ensuring every shot is perfectly crisp. A tripod also locks in your camera angle and framing, which is crucial for creating a consistent look across your entire product line.
When shopping for one, find a model sturdy enough that it won't wobble. An adjustable head is also a key feature, as it lets you shoot from various angles, including the popular overhead "flat lay" position.
Your tripod does more than just hold the camera steady; it locks in your perspective. This consistency is what separates an amateur-looking shop from a polished, trustworthy brand.
Before diving into lighting, let's break down the essential gear. It's easy to get overwhelmed, so here's a simple guide based on your needs and budget.
Essential Product Photography Gear Comparison
This table outlines the gear you’ll need, from DIY hacks for beginners to professional-grade equipment for scaling up.
| Equipment Type | Budget-Friendly Option (DIY/Entry-Level) | Mid-Range Option (Best Value) | Professional Option (High-End) |
|---|---|---|---|
| Camera | Modern Smartphone (iPhone, Android) | Entry-Level DSLR or Mirrorless Camera | Full-Frame Mirrorless or DSLR Camera |
| Tripod | Basic, lightweight tripod with adjustable head | Sturdy aluminum or carbon fiber tripod with a ball head | Heavy-duty tripod with a geared head for precise control |
| Lighting | Natural light from a large window + DIY reflectors | Entry-level strobe or continuous LED light kit (2 lights) | Professional studio strobes (e.g., Profoto, Godox) with modifiers |
| Backdrop | Large white foam board or roll of craft paper | Seamless paper roll (white, gray, colors) with a stand | Cyclorama wall or a wide variety of vinyl/fabric backdrops |
| Reflectors | White foam core board from a craft store | Collapsible 5-in-1 reflector (white, silver, gold, black, translucent) | Large V-flats or dedicated reflector panels with stands |
Remember, you can mix and match from these categories. The goal is to build a kit that works for your products and budget, not just to buy the most expensive gear.
Backdrops and Surfaces: Creating a Clean Canvas
Your background sets the mood for your product. A simple white backdrop is the e-commerce standard because it's clean and distraction-free, but don't feel limited to it. Experiment with surfaces and colors that align with your brand. The main goal is to make your product the hero.
Here are a few affordable and effective backdrop ideas:
- Seamless Paper: A large roll of white, gray, or colored paper is perfect for creating a clean "infinity sweep" look with no harsh corners.
- Foam Board: A large piece of white foam board from any craft store makes an excellent, cheap backdrop. It also doubles as a reflector to bounce light.
- Vinyl Backdrops: These come in endless textures like marble, wood, or concrete, giving you a lifestyle feel without needing heavy props.
- Fabric: A piece of neutral-colored linen or canvas can add a soft, organic texture that works beautifully for handmade or natural products.
Small Tools That Make a Big Difference
Beyond the main gear, a few inexpensive tools can significantly improve your photos. White foam boards are your new best friend—use them as reflectors to bounce light back onto your product and soften harsh shadows. This simple trick instantly makes your lighting look more professional.
You’ll also want to have clips or tape on hand to hold your backdrops in place. Having these small helpers ready will make your shoots run smoothly, allowing you to focus on getting the perfect shot. With this simple DIY setup, you have everything you need to start taking polished, professional photos that sell.
Mastering Light and Backgrounds
If you take only one piece of advice from this guide, let it be this: lighting is everything. It is the single element that can elevate a quick snap into a professional photo that sells your product. The good news? You don't need expensive studio gear to get it right. You just need to understand how to shape light.
Great lighting makes your products look high-end, shows their true colors, and builds immediate customer trust. On the other hand, bad lighting—too dark, too bright, or full of harsh shadows—makes even the best items look cheap.
Harnessing Natural Light Like a Pro
Your best and cheapest light source is right outside your window. Natural light is soft, diffused, and incredibly flattering for almost any product. The key is knowing how to use it.
For the best results, set up your product next to a large window, not directly in front of it. This allows the light to hit your product from the side, creating soft, natural-looking shadows that give your item shape and dimension.
Follow these actionable steps for great natural light shots:
- Avoid Direct Sunlight: Never shoot in harsh, direct sun. The sharp, dark shadows it creates look amateur and hide important details. An overcast day is ideal, as clouds act like a giant, natural softbox.
- Turn Off Indoor Lights: Your indoor lamps cast a warm, yellow light, while daylight is cool and blue. Mixing them creates color correction problems. Turn off all indoor lights and let the window do the work.
The goal is to create soft, beautiful light that makes your product the undeniable hero. Think of hard light as an interrogation lamp—stark and revealing every flaw. Soft light is like a gentle, flattering glow that makes everything look its best.
This infographic breaks down what you really need for a simple, effective DIY photo setup.
As you can see, the core of any great setup really boils down to three key tools: your camera, a sturdy tripod, and a quality light source.
Creating Soft Light with Artificial Sources
If you don't have a good window or need to shoot at night, you can easily recreate a soft, natural look with a single, affordable artificial light. The secret is to make the light bigger and softer by using a softbox.
A softbox is a fabric modifier that fits over your light source, diffusing the light to create soft shadows. You can buy a continuous LED light with a softbox kit for under $100, giving you complete control over your lighting anytime.
Position your single light at a 45-degree angle to your product, slightly above it and pointing down. This classic setup creates beautiful, dimensional lighting every time.
Choosing Backgrounds That Convert
Your background has one job: make your product look amazing without being distracting. While a clean white background is the e-commerce standard, feel free to choose a surface that fits your brand's aesthetic.
Here’s what to look for in a good background:
- Non-Reflective: Avoid glossy or shiny surfaces that create distracting glares.
- Complements Your Product: Pick colors and textures that enhance your product, not compete with it. A neutral color palette is a safe bet.
- Creates a Mood: For lifestyle shots, a textured background like wood or marble can add context and help customers envision the product in their own homes.
The demand for high-quality visuals has turned professional photography into a massive industry. In fact, the market is projected to be worth around $105.2 billion by 2025, all driven by the need for compelling brand images. This just underscores why learning to take great product photos is such a critical skill. You can find more insights on the photography industry's growth over on dojobusiness.com.
The easiest way to get a seamless, professional backdrop is with a "sweep." Simply take a large piece of paper or poster board, place it on a table, and gently curve it up against the wall behind your product. This trick eliminates the distracting corner where the table and wall meet, making your product appear to float in a clean, professional space.
Choosing the Right Camera Settings
With your lighting and background set, it's time to adjust your camera settings. This is how you tell your camera exactly how to capture the shot, and getting it right is the difference between a blurry photo and a sharp, professional one.
Whether you're using a DSLR or a smartphone, mastering a few key settings gives you control over the final image. Spending two minutes on this now will save you hours of editing later.
The Exposure Triangle Simplified
For those using a DSLR or mirrorless camera, you’ve likely heard of Aperture, ISO, and Shutter Speed. These three settings work together to control your photo's brightness. For product shots on a tripod, we only need to focus on two of them.
- Aperture (f-stop): This controls how much of your product is in focus from front to back. For product photos, you want the entire object to be sharp.
- ISO: This is the camera's sensitivity to light. A low ISO number results in a clean, crisp image without any distracting grain.
Since your camera is on a tripod, you can let it handle the shutter speed automatically.
The goal isn’t to become a technical master overnight. It’s about learning a simple, repeatable formula that delivers crisp, professional-looking images every single time.
Dialing in Your DSLR or Mirrorless Camera
Here is a simple, no-fail formula to get tack-sharp product photos every time:
- Switch to Aperture Priority Mode ("A" or "Av"): This semi-automatic mode lets you control aperture and ISO, while the camera handles the rest.
- Set a High f-stop (Aperture): Adjust your aperture to a number between f/8 and f/11. A higher f-stop number creates a "deep depth of field," meaning your entire product will be in sharp focus.
- Set a Low ISO: Set your ISO to its lowest native setting, usually 100 or 200. This prevents digital grain or "noise," which can make an image look cheap. Since you're using a tripod, you don't need to boost light sensitivity.
That’s it. Lock in those two settings, and your camera will deliver a perfectly exposed, sharp, and clean shot every time.
Getting Manual Control on Your Smartphone
You can get professional results with a smartphone, too. The default camera app often hides manual controls, but unlocking them is key to taking pro-level shots.
Here’s how to do it:
- Find "Pro" or "Manual" Mode: In your phone's native camera app, look for a mode called "Pro" or "Manual." This will reveal sliders for settings like ISO, focus, and brightness.
- Use a Third-Party App: If your phone doesn't have a pro mode, apps like the free version of Lightroom Mobile or the powerful Halide app can give you full DSLR-like control.
- Lock Focus and Exposure: Once in manual mode, tap the screen on your product to set the focus. A brightness slider will usually appear; adjust it until the image looks well-lit. To maintain consistency, tap and hold on the product until a lock icon appears. This locks both focus and exposure, ensuring every photo in your session looks uniform.
Styling and Composing Your Product Shots
Now for the creative part: making your products look irresistible. Styling and composition breathe life into your photos, turning a simple picture into a compelling story.
This is how you connect with customers. You’re not just showing them what your product is; you’re showing them why they need it.
Mastering Essential Camera Angles
The angle you shoot from can completely change your product's feel. Capture a variety of angles to give customers a complete view.
Here are the three most effective angles to master:
- The 45-Degree Angle (Hero Shot): Shot slightly from above and to the side, this angle mimics how we naturally view products on a shelf. It's perfect for showing depth and dimension and works great as your main product page image.
- The Top-Down Flat Lay: This overhead shot is excellent for arranging multiple items, showing the contents of a kit, or creating visually satisfying patterns for social media. It also highlights product textures well.
- The Eye-Level Shot: This straight-on angle presents your product directly to the viewer. It's a grounded, honest view that works well for items that stand upright, like bottles and jars.
The Rule of Thirds: A Simple Composition Trick
An easy way to make your photos more dynamic is by using the Rule of Thirds. Instead of placing your product right in the center of the frame, imagine your screen is divided by a tic-tac-toe grid.
Position your product along one of the lines or at an intersection point. This simple shift creates a more balanced and visually interesting image. To make this easy, just turn on the gridlines in your camera's settings.
Don't just show your product—tell its story. A simple prop, a thoughtful angle, or a bit of negative space can transform a static image into an invitation for your customer to imagine your product in their world.
Practical Styling Tips for Engaging Photos
Styling adds context and personality to your photos. The goal is to create a scene that feels authentic to your brand, but remember that props should support, not overshadow, your product.
Here are some actionable tips:
- Use Props to Show Scale: Place your product next to a universally recognized item, like a makeup brush or a coin. This gives customers an immediate sense of its actual size.
- Add Relevant Textures: If you're shooting a natural skincare line, try using a linen cloth or a smooth stone as a prop. These elements add a tactile feel and reinforce your brand's message.
- Create Different Shots for Different Platforms:
- For Product Pages: Keep it clean. A simple white background showing only the product is often best for clarity and conversion.
- For Social Media: Get creative! Use lifestyle shots, more props, and interesting backgrounds to build your brand's world and engage your audience.
Nailing these skills is also a smart business move. Photographers who have mastered composition and styling can see their revenue jump by up to 20%. It just goes to show how much clients value well-crafted images that tell a story. You can check out these examples of online portfolios to see how other pros are showcasing their work and building a strong visual brand.
Editing Your Photos for a Polished Finish
The photoshoot is just the first step; post-processing is where the magic happens. This final step is where a good photo becomes a professional one that builds a cohesive, trustworthy brand image.
Editing isn't about applying heavy filters or misleading customers. It’s about making small, intentional tweaks to make your photos look bright, clean, and true-to-life. The goal is to develop a simple, repeatable workflow that gives every image on your website the same polished feel.
The Essential Editing Workflow
You don’t need to be a graphic design expert. Accessible software like Adobe Lightroom or free mobile apps like Snapseed have all the tools you need. For brand consistency, stick to the same core adjustments for every photo.
Here are the four key edits that provide the most impact:
- Crop and Straighten: First, fix any crooked lines and crop the image to create a stronger composition. A tight, well-framed shot looks more intentional.
- Adjust Brightness and Contrast: Gently increase the brightness for a light, airy feel. A small boost in contrast will make your product pop without looking unnatural.
- Correct Color and White Balance: This is non-negotiable. Ensure the colors in your photo are accurate. Use the white balance tool to make sure your whites are pure white, not yellow or blue.
- Add a Touch of Sharpening: A final, subtle sharpening pass makes details look crisp and clear, which is crucial for web viewing. Be careful not to overdo it, as this can create a grainy look.
These simple adjustments, when applied consistently, will help you produce professional product photos that convert.
Post-processing isn't about trying to fix bad photos; it's about enhancing good ones. Your goal is to make the product on the screen look exactly as it does in real life—just on its best day.
Prepping Images for Your Website
After editing, the final step is exporting your images correctly. Saving your photos with the right settings ensures your website loads quickly without sacrificing image quality. For any business owner, it's vital to understand how to optimize images for web performance. This directly impacts user experience and SEO.
For those who want truly top-tier results, mastering advanced photo editing software like Photoshop can give you incredible control over color correction, retouching, and other final artistic touches.
But even with basic tools, a consistent editing process is what separates an amateur shop from a professional e-commerce brand. By nailing down a simple routine, you can produce stunning, high-quality images for every product in your lineup.
Common Questions in Product Photography
As you start shooting your own products, you'll likely encounter a few common challenges. Here are some simple, practical fixes for the most frequent issues business owners face.
How Do I Make My Whites Actually Look White?
This is a common problem: you shoot against a white background, but on camera, it looks gray or has a blue or yellow tint. This is almost always a white balance issue.
Your camera tries to guess what's "white" in the scene and often gets it wrong. Here's the easy fix in post-production:
- Find the white balance tool in your editing app (it usually looks like an eyedropper).
- Click the dropper on a part of the background that should be pure white. The software will instantly color-correct the entire image.
If the background still looks a bit gray after that, slightly increase the exposure or brightness until it's a clean white that makes your product pop.
How Can I Get Rid of Glare on Shiny Products?
Glare is a major challenge when shooting glossy packaging or reflective surfaces. The key is not to eliminate light but to control it. Direct, hard light creates distracting hot spots.
To solve this, you need to diffuse your light source. Try bouncing the light off a white foam board or a reflector before it hits your product. This softens and scatters the light, wrapping it around your product gently instead of hitting it head-on. This simple technique dramatically reduces or eliminates harsh glare.
The secret to great product photography isn't avoiding problems—it's knowing the simple, repeatable fixes for them. Most issues with glare, color, or sharpness can be solved with small tweaks to your lighting or editing.
What If I Don't Have Good Natural Light?
Not everyone has access to perfect natural light all day. The good news is you can easily create the same effect with one artificial light.
Here's how to fake amazing natural light anytime:
- Use a Daylight Bulb: Standard warm lamps won't work. Get a bright LED bulb with a color temperature around 5000K, which mimics the clean, neutral color of daylight.
- Diffuse the Light: A bare bulb is too harsh. Soften it by placing a softbox over your light or even hanging a thin white bedsheet between the light and your product. This spreads the light evenly.
This setup gives you complete control, allowing you to shoot stunning, consistent photos day or night, rain or shine.
Ready to showcase your stunning new product photos on a website that's just as beautiful? At gohappybeauty, we build SEO-optimized websites designed specifically for beauty business owners. Get started with gohappybeauty today!